FAQs: Auto Dialer Accessory
The Auto Dialer accessory adds automatic phone notification to the legacy RS-360 and most FloodMaster systems.
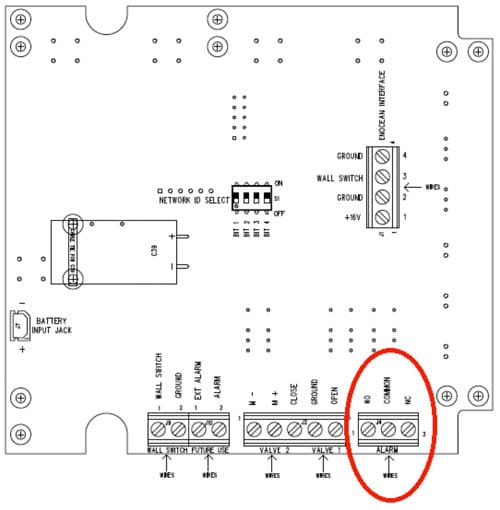
Install one wire to NO (pin 1) and one wire to COMMON (pin 2). On the Auto dialer side, install the wire coming from NO (pin 1) to TR1 and COMMON (pin 2) to 0V (Not shown below).
Yes. We provide 8’ of 2 conductor 22 AWG zip cord. Users can splice in additional lengths as desired or use their own standard alarm wire.
Distance should not exceed 50 feet.
22 AWG.
Yes – you can either replace the 8′ section with any 22 AWG, 2-conductor wire, or splice in whatever additional length you desire.
The Auto Dialer is designed as a general security system component and, as such, provides a tamper switch notification alarm. If you are receiving calls from the device that are not being triggered by your system, try this: Disable the tamper button in the back of the unit, or jump the TAMP switch pins on the front of the unit. (Refer to Installation Guide, Step 7).
The Auto Dialer must be in the off/disarmed mode to program the unit. You can place the unit in this mode by keying in the passcode (default from factory is 1-2-3-4) and pressing the ESC key. Conversely, you can arm the system by keying in the passcode and pressing the ENTER key.
The Auto Dialer only works with analog home telephone systems.
The system comes with a built-in delay time, which is designed to allow time for a user to cancel the dialing sequence. This default time is set at 30 seconds, but it can be adjusted by the user to fit their own requirements (see Installation Guide – Set exit delay time). Conversely, the Auto Dialer requires that same default time to arm itself. So, on power up, users should wait the required time (30 seconds) before they begin interfacing with the system.
Yes – the Auto Dialer is designed to accommodate many additional features and can also accept a second alarm input. Please refer to the Manufacturer’s Owner’s Manual for information and instructions beyond the RDT unit connection and interface.
Alarm 1 = Trigger 1.
Quick guide: Press 1-2-3-4 > RECORD > 1 > ENTER, record message now.
1. Key in the four digit user password code (factory default is 1-2-3-4).
2. Press RECORD.
3. Press 1 (to save as the message for alarm 1).
4. Press ENTER to start recording your 10 second message.
5. Press ENTER to stop the recording early, or wait for the 10 seconds to end.
6. To play back the message, press 1-2-3-4 > PLAY > 1 > ENTER.
You can enter a maximum of nine telephone numbers for the alarm. Each number can be a maximum of 32 digits. (If you are using this Auto Dialer on an office/work phone system, you may have to enter 9 before the number to get a line out.)
Quick guide: Press 1 2 3 4 > PROGRAM > 3 > ENTER > 1 > ENTER > Telephone # > ENTER
1. Key in the four digit user password code (factory default is 1-2-3-4).
2. Press PROGRAM > 3 > ENTER.
3. The number you press next will select the position in the sequence you want that telephone number to dial (1 = first number called, 2 = second number called, and so on).
4. Press ENTER and key in the first telephone number.
5. Press ENTER to exit the programming mode.
6. Repeat the process until you have entered all the numbers you wish the Auto Dialer to call once it has been activated (maximum 9 different numbers).
Quick guide: Press 1 2 3 4 > PROGRAM > 3 > ENTER > N > ESC
1. Key in the four digit user password code (factory default 1-2-3-4).
2. Press PROGRAM > 3 > ENTER.
3. Press N (N = 1 for the first number called; 2 for the second number called; etc.).
4. Press ESC to exit the programming mode.
Quick guide: Press 1 2 3 4 > PROGRAM > 6 > ENTER > X > ENTER > N > ENTER
1. Key in the four digit user password code (factory default 1-2-3-4).
2. Press PROGRAM > 6 > ENTER.
3. Press X (X = 1 for alarm 1). Press ENTER.
4. Press N (N = 1 for first phone number; 2 for second phone number, etc.). Press ENTER.<
5. Repeat the process to designate any other numbers to the alarm.
Quick guide: Press 1 2 3 4 > PASSWORD > New Code > Confirm New Code
1. Key in the four digit user password code (factory default 1-2-3-4).
2. Press PASSWORD
3. The LCD will change to n-p.
4. Key in your new four digit user password code.
5. The LCD will change to c-p.
6. Key in your new four digit user password code again.
7. The LCD will change to acc.
Quick guide: Press 1 2 3 4 > PROGRAM > 1 > ENTER > N > ENTER
1. Key in the four digit user password code (factory default 1-2-3-4).
2. Press PROGRAM > 1 > ENTER
3. Press N (N = 0 for without audible alarm, 1 for with audible alarm). Press ENTER.
Quick guide: Press 1 2 3 4 > PROGRAM > 2 > ENTER > Time > ENTER
1. Key in the four digit user password code (factory default 1-2-3-4).
2. Press PROGRAM > 2 > ENTER
3. Press Time (Time = 1 for one minute, 2 for 2 minutes, etc. up to 99 minutes). Press ENTER.
The entry/exit times are the times the Auto Dialer gives you to enter/exit the area covered by the system before it arms/alarms. These are pre-set to 30 seconds. You can also change the timing to instant or 60 seconds.
Entry Delay:
Quick guide: Press 1 2 3 4 > PROGRAM > 4 > ENTER > N > ENTER
1. Key in the four digit user password code (factory default 1-2-3-4).
2. Press PROGRAM > 4 > ENTER
3. Press N (N = 0 for instant; 3 for 30 seconds; 6 for 60 seconds). Press ENTER.
Exit Delay:
Quick guide: Press 1 2 3 4 > PROGRAM > 5 > ENTER > N > ENTER
1. Key in the four digit user password code (factory default 1-2-3-4).
2. Press PROGRAM > 5 > ENTER
3. Press N (N = 0 for instant; 3 for 30 seconds; 6 for 60 seconds; 9 for 90 seconds). Press ENTER.
Quick guide: Press 1 2 3 4 > PROGRAM > 7 > ENTER > N > ENTER
1. Key in the four digit user password code (factory default 1-2-3-4).
2. Press PROGRAM > 7 > ENTER
3. Press N (N = 0 without sound; 1 with sound). Press ENTER.
Quick guide: Press 1 2 3 4 > ENTER
1. Check that the voice message and at least one phone number has been programmed into the Auto Dialer.
2. Press 1 2 3 4 > ENTER. The Auto Dialer will show ‘ON’ on the display.
3. The alarms will become active after the delay time you have set has expired.
Quick guide: Press 1 2 3 4 > ESC
To disarm the Alarm System or to stop the Dialer from dialing out after either the tamper switch (if connected and active) or an alarm input has been activated, key in the four digit user password code followed by ESC. The Auto Dialer will revert to the ‘OFF’ mode and must be re-set to the ‘ON’ mode as above.
Quick guide: Answer the phone and press # or * to stop dialing sequence.
When the Auto Dialer starts dialing, it will dial the first telephone number and repeat the pre-recorded voice message for 1 minute. If there is no response from the phone, then it will hang up and dial the next number until all the programmed numbers for that alarm are dialed. It will repeat this dial sequence three times and display ‘NO ANSWER’ if there is no response from any of the phone numbers. To stop this dial sequence, press the * key on the telephone keypad that is receiving the call. At that time, the Auto Dialer will stop its dialing sequence and the alarm (if programmed) will stop. If the local alarm has been programmed as active, then pressing the # key will stop the dialing sequence, but the alarm will continue to sound until timed out. In both cases, the Auto Dialer will remain ON, waiting for any further alarm.
Important: It is recommended to change the back-up battery at least once a year, even if the battery is not low.
1. First make sure that the Auto Dialer is OFF. Then release it from the wall.
2. Remove the battery door and take out the old battery. Insert new 9V battery and make sure it is in the correct polarity.
3. Fit the battery door and mount the Auto Dialer back onto the wall.
Inside the battery compartment: Remove the power supply and the Auto Dialer from the wall. Remove the 9V battery. Inside the battery compartment is a switch. Move it to the ERASE position. Connect the power to the Auto Dialer then press DELETE twice. There will be 2 short beeps from the Auto Dialer. Switch the power off again. Place switch back to NORMAL. Replace the 9V battery and place back onto the wall. Power the Auto Dialer back up. The Auto Dialer will then return to factory default setting.